Description
Supports Four Screen Projection Modes:
For Iphone: Carplay/AirPlay
For Android Phone:Android Auto/Miracast
T322 Front Or Cabin: UHD 4K 3840*2160P; Back:AHD 1080P
Language Support:
English, Chinese, Korean, Japanese, Portuguese, Polish, Spanish, Arabic, French, German, Italian, Hebrew, Russian, Turkish, Czech, Dutch,Vietnamese,Malay.
Memory Card Support: 32G/64G/128G/256G
Due to the fact that DVR is a 4K high-definition recording high-speed storage, please make sure to use high-quality U3 grade C10 high-speed brand memory cards. Some ordinary and inexpensive memory cards may not function properly.
About Formatting The Memory Card:
When installing a memory card for the first time, be sure to format the memory card on the DVR. After formatting, the DVR can correctly match the memory card.
Formatting Steps: After installing the memory card, please enter the DVR menu, find the format option, and click to format the memory card(Important: Formatting the memory card on the computer is an incorrect operation. Please be sure to format the memory card on the DVR’s menu option.)
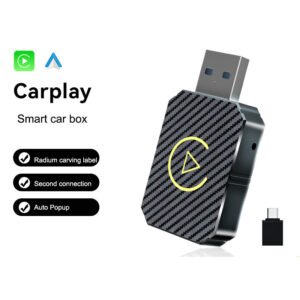
About The Connection Of Carplay And Android Auto:(1) If it is an Apple phone, the DVR needs to choose the Carplay connection method as the connection method, and the Carplay software installed on the Apple phone can directly connect to the DVR through the Carplay function;(2) If it is an Android system phone, the DVR needs to select Android Auto as the connection method, and then use the Android Auto software downloaded from the Google App Market on the phone to connect to the DVR.
About WIFI Connection:
Before connecting to the DVR on the phone, it is necessary to install the WIFI connection app “Viidure” in advance.You can search for “Viidure” installation in the Apple App Store or Google App Market.
Steps:
(1) In standby mode, enter the DVR menu and enter the WIFl setting menu;
(2)In the wifi menu of the DVR, check to obtain the wifi SSID name and password;
(3)Open the “Viidure” APP on your phone, enter the configuration mode, turn on the wifi function of the phone, follow the prompts to find the SSID wifi signal of the DVR and enter the password to connect;
(4)After successful configuration, you can connect and operate the DVR through the “Viidure” APP.
About The Reversing Assist Function:
If the kit you ordered includes a rearview camera and you need to implement the reversing assist function, you need to connect the red signal wire of the rearview camera to the car’s reversing light (the light will come on when reversing). If you don’t need the reverse assist function, just disconnect the red signal wire and leave it unconnected.
T322 About 24-Hour Parking Monitoring:
If you need the 24 hour parking monitoring function, you can order the corresponding Buck Line accessories to replace the car charger.Through Buck Line, the DVR power can be obtained directly from the car battery or car ACC, so that the DVR can maintain normal recording work even when the car is turned off.(Since different car models have different battery interfaces or ACC interfaces, it is not recommended to install it by yourself. It is recommended to find a professional to install the Buck Line.)
About The Installation And Use Of GPS(Optional):
1. Connect the GPS module to the DVR and turn on the GPS function in the DVR menu settings;
2. Install the DVR on the car and start the recording mode. Start the car outdoors and drive for a certain distance. The GPS module will automatically capture the satellite signal and the DVR will automatically record the video with the GPS driving track.
T322 Video Playback Of GPS Tracks:
1. Install the GPS dedicated video player “Hit GPS Player” on your computer. Please enter the link below in your computer browser to download and install;
Download link: https://pcgps.ce2ce.com/hit/hitplayer.html
2. Open the recorded DVR video with GPS track information on the computer through “Hit GPS Player” to play back the GPS driving track.
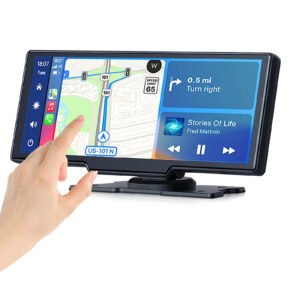
10.26 Inch Car DVR Carplay Steteo


10.26″CentralControl Smart Screen Car Dvr
ISO ANDROID
AirPlay/Mirror wireless Mirroring
Support siri and Google Assistant Front 1080P 170°wide angle Rear AHD720P
170° wide angle Reverse
support Driving Habbit selection switching
(Left Driving Or Right Driving)

K-Play Easy-Mount 7″IPS Touch Monitor Mobile phone fast charging

Wireless Carplay/Wireless Android Auto
FM+AUX signal transmission

Camera
Can be external
360°View Angle Adjustable
 Bluetooth 5.1 Make Driving Safe
 12NMprocessorfasterspeed and less heatdissipation
 Can be external CameraConnection Indication
 Company Profile
 Certifications
FAQ:
1:Is this device suitable for my car?
This is a 7″ universal car radio, just fix it on the center console or attach it to the windshield, and you will get a perfect car companion
2: How to connect wireless carplay/android auto?
First pair the mobile phone with Bluetooth, and then connect to the WIFI signal. After both are connected, carplay/android auto will automatically jump to the corresponding interface.
3: How to connect wired carplay/android auto?
It can be connected through the mobile phone data cable, please pay attention to use the original car cable that can be used for data transmission.
4: How to connect airplay?
First complete the setting: setting – phone link – I0S device (iso mirror) /wireless connection (airplay), after the setting is completed, restart the car radio to use the airplay function normally.
5: Why is there no sound from the device?
1. The AUX cable is inserted and the FM transmitter switch is turned on.
2. When the FM transmitter switch is turned on, the speaker has no sound.
6:Is it possible to transmit audio to the car’s speakers via Bluetooth?
No, only via AUX cable or FM channel.
7:How to sync sound via FM?
Turn on the FM TANSMITTER on the device, click ON on the device, adjust the channel of the car radio to a blank station, and set the radio on the device to the same frequency as the radio on the car, the setting is complete.
8:How to sync sound via AUX cable?
Find the AUX cable in the package, then connect one end of the cable to the AUDIO port on the top left of the device, connect the other end to the AUX-IN port on the car, and enter the AUX playback interface of the car radio to synchronize the sound – Set up.
9:Why doesn’t the screen light up?
1. Check whether the power supply is plugged in properly. If one end of the cigarette lighter is installed in place, the indicator light on the USB will light up, and the other end will be connected to the lowermost DC 12V power supply port on the left side of the device.
2. After confirming that the power is turned on, if the screen is still not on, there is a reset button on the back of the device, press and hold for 3 seconds.
3. Software problems, you can upgrade the software, please contact customer service.
10:What should I do if the touch buttons do not work after the upgrade?
Follow the upgrade video, the upgrade process takes two times, and only one upgrade may cause the touch buttons on the bottom of the device to not work. (Please contact customer service for upgrade software and upgrade video).
11:What should I do if the screen is blurry or I can’t see the screen clearly when I wear sunglasses?
Adjust the VCOM parameters in the settings (if you need to operate the video, please contact customer service).
12:Can I use the rear camera of the original car/other brand?
No, only the rear camera of Grandnavi is supported, the camera of the original car/other brands is not suitable for the device.
13:How to install the bracket?
1. Front windshield installation: attach the bracket to the front windshield through the adhesive suction cup
2. Center console installation: Adsorb the bracket on the center console through the adhesive suction cup. If the surface of the center console is not smooth enough, you can lock the mounting pad on the center console with screws, and the stability of the bracket will be improved.


Reviews
There are no reviews yet.